The tracking method which is used to track/capture the various player states of an embedded video is
called ‘video tracking’.
A player state is a specific user interaction with a video.
Following are the example of various player states which can be captured for YouTube videos via GTM:
#1 Start – denotes video is playing.
#2 Pause – denotes video is paused.
#3 Seek – denotes scrub bar is moved to seek or reposition timing within a video.
#4 Buffering – denotes video buffering / downloading.
#5 Progress – denotes the progress of a specific video by percentage or time threshold. For example,
if 5% of the total video length has been played then the value of Progress can be 5%. Similarly, if 10
seconds of video has been played then the value of Progress can be 10 seconds.
#6 Complete – denotes a video finished playing.
Step-1: Login to your Google Tag Manager (GTM) account and then click on the ‘Folders’ tab:

Step-2: Click on the ‘New Folder’ button.
Step-3: Name your new folder ‘YouTube Video Tracking’ and then click on the ‘create’ button. We are going to use this folder to store all tags, triggers and variables related to YouTube Video tracking.
Step-4: Click on the ‘Variables’ tab:

Step-5: Click on the ‘Configure’ button:

Step-6: Scroll down and then select all the built-in variables related to videos:
1. Video Provider
2. Video Status
3. Video URL
4. Video Title
5. Video Duration
6. Video Current Time
7. Video Percent
8. Video Visible

Step-7: Click on the ‘New’ button under ‘User Defined Variables’ column:

Step-8: Create a new dataLayer variable with following configurations and then move the variable to
the folder named ‘YouTube Video Tracking’:

This dataLayer variable is used to pull the value of gtm.videoElapsedTime from the dataLayer.
The gtm.videoElapsedTime dataLayer variable reports on the time elapsed (in seconds) since the last
time a video was paused or buffered.
Later when we create a new universal analytics tag to send video tracking data to GTM, we are going
to call this dataLayer variable within the tag.
Step-9: Create a new lookup table variable (name it ‘Video Player State’) with following configurations and then move the variable to the folder named ‘YouTube Video Tracking’:

I have created this variable to rewrite the outputs of the ‘video status’ variable.
The ‘video status’ variable is a built-in GTM variable which returns the current video player state.
By re-writing the values of the current player state, I am making the video tracking report in Google Analytics more meaningful for the end users (like my clients) who might not understand what ‘progress’ means or what ‘start’ stands for etc.
Step-10: Click on the ‘Triggers’ tab:

Step-11: Click on the ‘New’ button to create a new trigger.
Step-12: Name your new trigger as ‘YouTube Video Trigger’ and then move the trigger to the folder
named ‘YouTube Video Tracking’ (by clicking on the folder icon next to the trigger name):

Step-13: Choose ‘YouTube Video’ as trigger type:

Your screen should now look like the one below:

Step-14: At this point, you need to decide your video tracking setup:

Here, I am measuring all available player states of a YouTube Video.
The progress of my videos should be measured whenever a user passes the following percentage thresholds: 10,25,50,75,90
Add JavaScript API support to all YouTube videos.
The YouTube Video Trigger will fire on all pages of my website.
Step-15: Click on the ‘Save’ button to complete the creation of the new trigger.
Step-16: Click on the ‘Tags’ tab:

Step-17: Click on the ‘New’ button to create a new tag.
Step-18: Name the new tag ‘Send YouTube Video Tracking data to GA’ and then move it to the folder named ‘YouTube Video Tracking’.
Step-19: Set up the new tag with following configuration:


We are going to use this tag to send the video tracking data to Google Analytics.
Step-20: Set the firing trigger of the ‘Send YouTube Video Tracking data to GA’ tag to the ‘YouTube
Video Trigger’ we created earlier:

Step-21: Click on the ‘Save’ button to complete the tag set up.
Step-22: Click on the ‘Preview’ button (on the top right hand side) to preview and test your new video tracking setup:

Step-23: Navigate to the web page on your website where you want to test your new video tracking
setup and which has got a YouTube video embedded on the page.
You should see a ‘preview’ window at the bottom of your browser window:

Step-24: Now play, pause and/or seek the embedded YouTube video.
As you interact with the video player, you should see the new ‘gtm.video’ event(s) being listed….one
after the other under the ‘Summary’ column:

Step-25: Click on one of the ‘gtm.video’ events and then click on the ‘Data Layer’ tab:

Step-26: Now look at the values of following data layer variables:

Here,
Step-27: Navigate back to your GTM account and then click on the ‘Leave Preview mode’ button:

Step-28: Click on the ‘submit’ button (on the top right hand side):

Step-29: Enter your version name and then click on the ‘Publish’ button.
Step-30: Navigate back to the web page on your website which has got a YouTube video embedded on the page. Now play, pause and/or seek the embedded YouTube video.
Step-31: Wait for 10-15 minutes and then navigate to ‘Behavior’ > ‘Events’ > ‘Top Events’ report in your Google Analytics view:

Step-32: Find and click on ‘YouTube Videos Tracking’ event category:
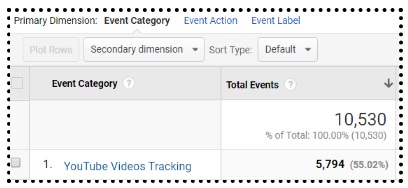
In this event category you can find all of your video tracking data:

called ‘video tracking’.
A player state is a specific user interaction with a video.
Following are the example of various player states which can be captured for YouTube videos via GTM:
#1 Start – denotes video is playing.
#2 Pause – denotes video is paused.
#3 Seek – denotes scrub bar is moved to seek or reposition timing within a video.
#4 Buffering – denotes video buffering / downloading.
#5 Progress – denotes the progress of a specific video by percentage or time threshold. For example,
if 5% of the total video length has been played then the value of Progress can be 5%. Similarly, if 10
seconds of video has been played then the value of Progress can be 10 seconds.
#6 Complete – denotes a video finished playing.
Setting up Video Tracking via YouTube Video Trigger In Google Tag Manager
Follow the steps below:Step-1: Login to your Google Tag Manager (GTM) account and then click on the ‘Folders’ tab:
Step-2: Click on the ‘New Folder’ button.
Step-3: Name your new folder ‘YouTube Video Tracking’ and then click on the ‘create’ button. We are going to use this folder to store all tags, triggers and variables related to YouTube Video tracking.
Step-4: Click on the ‘Variables’ tab:
Step-5: Click on the ‘Configure’ button:
Step-6: Scroll down and then select all the built-in variables related to videos:
1. Video Provider
2. Video Status
3. Video URL
4. Video Title
5. Video Duration
6. Video Current Time
7. Video Percent
8. Video Visible

Step-7: Click on the ‘New’ button under ‘User Defined Variables’ column:
Step-8: Create a new dataLayer variable with following configurations and then move the variable to
the folder named ‘YouTube Video Tracking’:
This dataLayer variable is used to pull the value of gtm.videoElapsedTime from the dataLayer.
The gtm.videoElapsedTime dataLayer variable reports on the time elapsed (in seconds) since the last
time a video was paused or buffered.
Later when we create a new universal analytics tag to send video tracking data to GTM, we are going
to call this dataLayer variable within the tag.
Step-9: Create a new lookup table variable (name it ‘Video Player State’) with following configurations and then move the variable to the folder named ‘YouTube Video Tracking’:
I have created this variable to rewrite the outputs of the ‘video status’ variable.
The ‘video status’ variable is a built-in GTM variable which returns the current video player state.
By re-writing the values of the current player state, I am making the video tracking report in Google Analytics more meaningful for the end users (like my clients) who might not understand what ‘progress’ means or what ‘start’ stands for etc.
Step-10: Click on the ‘Triggers’ tab:
Step-11: Click on the ‘New’ button to create a new trigger.
Step-12: Name your new trigger as ‘YouTube Video Trigger’ and then move the trigger to the folder
named ‘YouTube Video Tracking’ (by clicking on the folder icon next to the trigger name):
Your screen should now look like the one below:
Step-14: At this point, you need to decide your video tracking setup:
- Whether or not you want to measure ‘Pause’, ‘Seeking’, ‘Buffering’ and/or ‘Progress’ Player states.
- When the progress of videos should be measured?
- How the progress of videos should be measured? In terms of percentages or time thresholds?
- Whether or not you want to add JavaScript API support to all YouTube videos
- What pages the ‘YouTube Video’ trigger should fire.
Here, I am measuring all available player states of a YouTube Video.
The progress of my videos should be measured whenever a user passes the following percentage thresholds: 10,25,50,75,90
Add JavaScript API support to all YouTube videos.
The YouTube Video Trigger will fire on all pages of my website.
Step-15: Click on the ‘Save’ button to complete the creation of the new trigger.
Step-16: Click on the ‘Tags’ tab:
Step-17: Click on the ‘New’ button to create a new tag.
Step-18: Name the new tag ‘Send YouTube Video Tracking data to GA’ and then move it to the folder named ‘YouTube Video Tracking’.
Step-19: Set up the new tag with following configuration:

We are going to use this tag to send the video tracking data to Google Analytics.
Step-20: Set the firing trigger of the ‘Send YouTube Video Tracking data to GA’ tag to the ‘YouTube
Video Trigger’ we created earlier:
Step-21: Click on the ‘Save’ button to complete the tag set up.
Step-22: Click on the ‘Preview’ button (on the top right hand side) to preview and test your new video tracking setup:
Step-23: Navigate to the web page on your website where you want to test your new video tracking
setup and which has got a YouTube video embedded on the page.
You should see a ‘preview’ window at the bottom of your browser window:
Step-24: Now play, pause and/or seek the embedded YouTube video.
As you interact with the video player, you should see the new ‘gtm.video’ event(s) being listed….one
after the other under the ‘Summary’ column:
Step-25: Click on one of the ‘gtm.video’ events and then click on the ‘Data Layer’ tab:
Step-26: Now look at the values of following data layer variables:
Here,
- ‘gtm.video‘ is the name of the event that activates the YouTube Video trigger.
- ‘gtm.videoProvider‘ variable returns the name of the video platform whose videos you are tracking. Its value is ‘youtube’.
- ‘gtm.videoStatus‘ variable returns the current player state of a video. Its values can be: start, complete, pause, seek, buffering and progress.
- ‘gtm.videoUrl‘ variable returns the URL of the embedded video.
- ‘gtm.videoTitle‘ variable returns the the title of the embedded video.
- ‘gtm.videoDuration‘ variable returns the total length of the embedded video in seconds.
- ‘gtm.videoCurrentTime‘ variable returns the time (in seconds) where a user was when the last video event fired.
- ‘gtm.videoElapsedTime‘ variable returns the time elapsed (in seconds) since the last time the video was paused or buffering.
- ‘gtm.videoPercent‘ variable returns the percentage of the total video length where a user was when the last video event fired.
- ‘gtm.videoVisible‘ variable returns either true or false, depending on whether or not the embedded video was visible in the viewport when the last video event fired.
Step-27: Navigate back to your GTM account and then click on the ‘Leave Preview mode’ button:
Step-28: Click on the ‘submit’ button (on the top right hand side):
Step-29: Enter your version name and then click on the ‘Publish’ button.
Step-30: Navigate back to the web page on your website which has got a YouTube video embedded on the page. Now play, pause and/or seek the embedded YouTube video.
Step-31: Wait for 10-15 minutes and then navigate to ‘Behavior’ > ‘Events’ > ‘Top Events’ report in your Google Analytics view:
Step-32: Find and click on ‘YouTube Videos Tracking’ event category:
In this event category you can find all of your video tracking data: