2. Set BIOS password in MSI Motherboard
Step 1: Enter BIOS
- Restart your computer.
- Press the Del on your keyboard to enter the BIOS.
Step 2: Find password settings
- Navigate to the "Settings" and click on "Security" section.
Step 3: Set the administrator password
- Find and select the "Administrator Password" option.
- Enter the desired password when prompted.
- Confirm the password by typing it again.
- The new password is now set.
- Select "Password Check" to "Setup" or "BIOS" based on requirement.
- Select "Password Clear" to "Disabled".
- Save your changes and exit the BIOS.
3. Toshiba Laptop - Open BIOS by pressing "F12" & Boot Menu by "F2"
4. Use Hard Drive As RAM On Windows
- Activate search box by clicking on it in taskbar or by pressing Win + R in the keyboard.
- Type "control panel" into the search box and click on the Control Panel desktop app from the result.
- Type "performance" into the search box and click on the Adjust the appearance and performance of windows from the result.
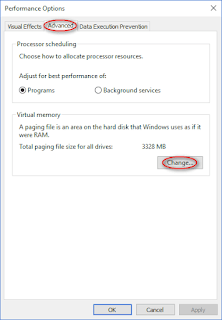
- Click on the Advanced system settings from the left side.
- Make sure that you stay in the Advanced tab.
- Now, click on the Settings button under Performance area.
- Shift to the Advanced tab.
- Click on the Change… button in the lower right.
- Now, you’re able to let Windows Automatically manage paging file size for all drives or type accurate value into the textboxes following Initial size and Maximum size.
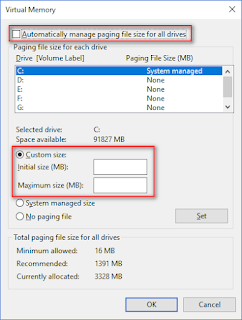
- Click on the OK button in all the opening windows to confirm.
- Click on the Restart Now button in the prompt window to apply these changes.
5. Delete temp files in Windows
- Press Win + R & type "%temp%" & delete all the files.
- Press Win + R & type "temp" & delete all the files.
- Press Win + R & type "prefetch" & delete all the files.
- Press Win + R & type "cleanmgr" & press "OK" & "OK" to clean the temp files from disk.
- Press Win + R & type "%appdata%" & delete Software files as per requirement.
6. Speed up your graphics in Windows
- Activate search box by clicking on it in taskbar or by pressing Win + R in the keyboard.
- Type "control panel" into the search box and click on the Control Panel desktop app from the result.
- Type "performance" into the search box and click on the Adjust the appearance and performance of windows from the result.
- In "Visual effects" tabs select the below 3 options in "Custom"

- Click on the OK button in all the opening windows to confirm.
7. Speed Up Windows Startup
- Click Start -> Run and type in msconfig.

- Boot options using the Boot tab
- Click on the "Advanced Options" button brings up the Boot Advanced Options dialog box.

- Click on the Check Box of "Number of processors"
- Select the "number of processors" from the drop-down list to "4".
- Click on the OK button in all the opening windows to confirm.
- Click on the Restart Now button in the prompt window to apply these changes.
8. Disable Windows update
Use the Windows Update service
- Press the Windows key + R on your keyboard to open the Run dialog box.
- Type “services.msc” and press Enter to open the Services window.
- Scroll down and locate the “Windows Update” service.
- Right-click on the service and select “Properties.”
- In the Properties window, change the “Startup type” to “Disabled.”
- Click on “Apply” and then “OK” to save the changes.
Use the Windows Registry (Win 10)
- Press the Windows key + R on your keyboard to open the Run dialog box.
- Type “regedit” and press Enter to open the Registry Editor.
- Navigate to the following key: HKEY_LOCAL_MACHINE/SOFTWARE/Policies/Microsoft/Windows/WindowsUpdate
- Right-click on the “WindowsUpdate” folder and select “New” > “DWORD (32-bit) Value.”
- Name the new value “AUOptions” and set it to “2” to disable automatic updates.
- Click on “OK” to save the changes.
Use the Windows Registry (Win 11)
- Open Registry Editor: Press Windows Key + R, type regedit, and hit Enter.
- Navigate to Policy Key: Navigate to: HKEY_LOCAL_MACHINE\SOFTWARE\Policies\Microsoft\Windows.
- Create WindowsUpdate Key: Right-click the Windows folder, select New > Key, and name it WindowsUpdate.
- Create AU Key: Right-click WindowsUpdate, select New > Key, and name it AU.
- Create NoAutoUpdate Value: Right-click inside the right pane of AU, select New > DWORD (32-bit) Value or QWORD (64-bit) Value.
- Rename Value: Name it NoAutoUpdate and press Enter.
- Set Value: Double-click NoAutoUpdate and set its Value data to 1.
- Restart: Restart your computer to apply the changes.
9. Stop Window background service
- Press Win + R to open the Run dialog.
- Type services.msc and press Enter.
- Find the below item in the list.
- SysMain
- Connected User Experiences and Telemetry
- Xbox Accessory Management Service
- Xbox Live Auth Manager
- Xbox Live Game Save
- Xbox Live Networking Service
- Right-click it and select "Properties".
- Click "Stop" to stop the service, if it is running.
- Change "Startup Type" to "Disabled" and click "Apply".
11. Disable Fast Startup (Windows)
- Open the Control Panel.
- Go to "Power Options".
- Click "Choose what the power buttons do".
- Click "Change settings that are currently unavailable".
- Uncheck the box next to "Turn on fast startup (recommended)".
- Click "Save changes".
13. PC Manager
15. TeamViewer
16. AnyDesk
17. Increase WiFi Speed
Via Device Manager
- Press the Windows key + R on your keyboard to open the Run dialog box.
- Type “devmgmt.msc” and press Enter to open the Device Manager.
- Expand Network adapters and find your wireless adapter.
- Right-click the adapter and select Properties.
Via Network Connection
- Press the Windows key + R on your keyboard to open the Run dialog box.
- Type “ncpa.cpl” and press Enter to open the Network Connection.
- Right-click on your Wi-Fi adapter and select "Properties".
- Click on "Configure" button.
- Uncheck the box that says "Allow the computer to turn off this device to save power".
- 802.11 mode: Set this to the highest supported standard, such as 802.11ax or 802.11ac.
- Preferred Band Selection: Set to 5 GHz or 6 GHz for better performance where available.
- Channel BandWidth: Set to Auto for the 5 GHz and 6 GHz bands, and consider using 20 MHz for 2.4 GHz to improve stability.
- Roaming Aggressiveness: Set this to a lower value (e.g., Lowest or Medium-Low) if you have a stable connection, or a higher value if you are further from the router.
- Transmit Power Level: Set to the highest value available, often labeled "Highest" or "100%," to maximize signal strength.
Step 3: Go to Control Panel > Hardware and Sound > Power Options
- Open the Control Panel and go to Hardware and Sound > Power Options.
- Click on Change plan settings next to your selected power plan.
- Click on Change advanced power settings.
- Expand the Wireless Adapter Settings section.
- Expand Power Saving Mode and set the options for both "On battery" and "Plugged in" (if applicable) to Maximum Performance.
Update drivers: Ensure your wireless adapter drivers are up to date.
18. Batch file to open tabs in a NEW browser window
- Open Notepad.
- Enter the commands.
- Save the file.
- Enter a file name with the .bat extension, such as opentabs.bat.
- Click Save.
To open URLs in your default browser:
@echo off
start https://www.example.com
start https://www.anotherwebsite.org
start https://www.yetanothersite.net
To open URLs in particular browser:
@echo off
rem Open in Chrome
start chrome "http://www.example.com"
rem Open in Firefox
start firefox "C:\path\to\your\file.html"
rem Open in Microsoft Edge
start msedge "http://www.example.com"
19. Checking system performance
- Open PowerShell as an administrator.
- Type the following command "Get-CimInstance Win32_WinSAT" and press Enter.
- Note the WinSPRLevel i.e The overall base score of your system.
Score Interpretation:
- 1.0 - 3.9: Low performance, best for basic tasks.
- 4.0 - 5.9: Moderate performance, suitable for general office work and web browsing.
- 6.0 - 7.9: Good performance, handles most modern applications and some light gaming smoothly.
- 8.0 - 9.9: High performance, built for demanding tasks like heavy multitasking, gaming, and content creation.
20. Check Your PC Specifications Using DxDiag
- Press the Windows key + R on your keyboard to open the Run dialog box.
- In the text field, type dxdiag.
- Press Enter or click OK.
- If prompted to check if your drivers are digitally signed, click Yes.
- Navigate the Information Tabs
- System Tab: View your Operating System version, Processor (CPU) details, Memory (RAM) capacity, and DirectX Version.
- Display Tab(s): Find details about your Graphics Card (GPU), including the name, manufacturer, and available Video Memory (VRAM).
- Sound Tab: Check information about your Audio Output devices and driver versions.
- Input Tab: Review connected hardware like your Keyboard, Mouse, and other peripherals
21. How to Generate and View Battery Report
- Click Start, type "cmd", right-click Command Prompt, and select Run as administrator.
- Type powercfg /batteryreport and press Enter.
- Copy the file path, paste it into your web browser's address bar, and press Enter.
23. How to check Windows activation status with commands
- Press Windows Key + R, type cmd, right-click Command Prompt and select Run as administrator.
- Type the following command slmgr /xpr and press Enter:
- View Status
24. Steps to Limit Reservable Bandwidth in Windows
- Open Group Policy: Type gpedit.msc into the Windows search box and press Enter.
- Navigate to Policy: Go to Computer Configuration > Administrative Templates > Network > QoS Packet Scheduler.
- Configure Setting: Double-click Limit reservable bandwidth.
- Set to Zero: Select Enabled, and in the "Bandwidth limit" option, change it to 0%.
- Apply and Restart: Click Apply, OK, and restart your PC.